Radio Power in the Field - Follow on
Categories: Radio
Previously, I wrote about building a battery for my portable radio operations. This project has been a long and agonising one. Batteries are really difficult, and I spent a good chunk of June, July and August thinking about them.
The Winning Design
As I discussed in that last blog post, the architecture I settled upon was:
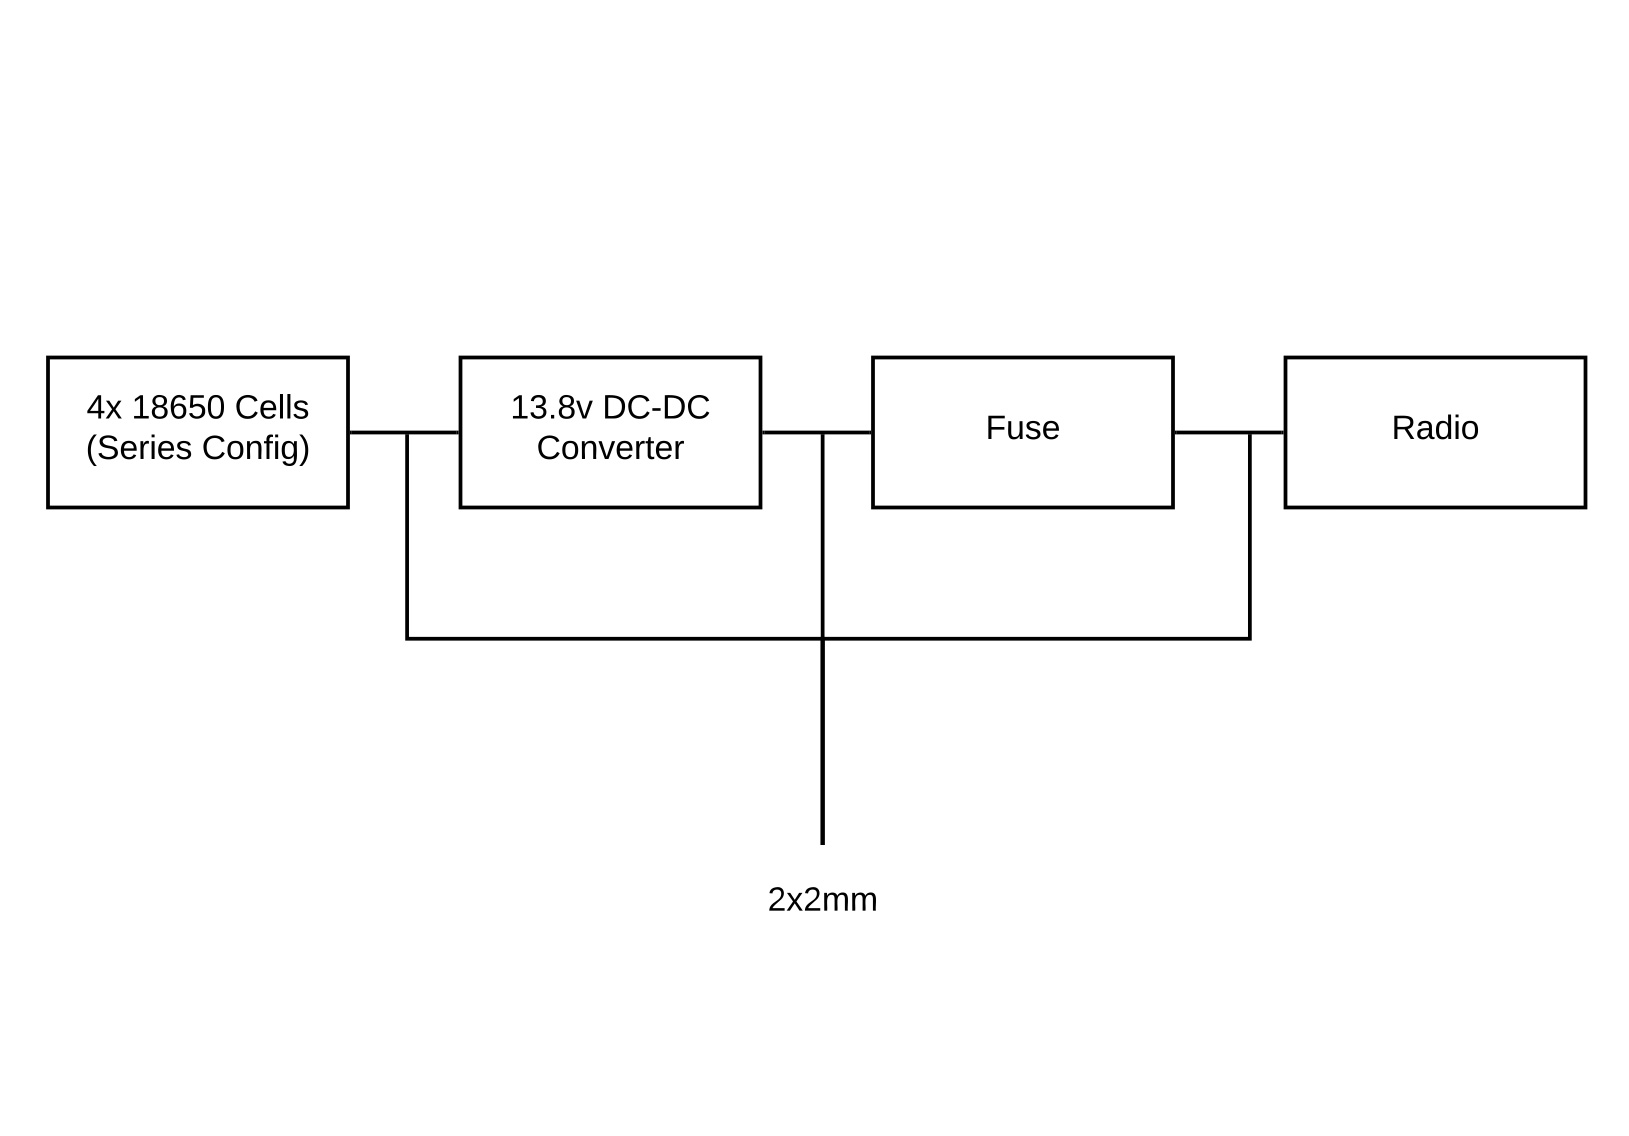
I’ve learned quite a lot, made a large number of wrong assumptions and joined a lot of dots in my head as this has gone on. I’ve also made a large number of observations that will be helpful to other people interested in battery powered radio operation.
TL;DR
Let’s get the final results and project summary out the way first.
Lithium Ion cells are not a suitable technology for battery powering radios in the way I had imagined. The 18650 variety are cheap, they are plentiful and they are convenient, but they don’t lend themselves well to this application.
Next time, I shall use LifePo4. It’s a little more expensive, but it removes a lot of the systematic complication I’m still dealing with.
Why? Let’s go deeper.
Assembly
First off, I decided to not use the battery holders I pictured previously. Uprating the wires to handle the current I’m interested in was going to be far too much work, so I settled on a Quarter Vruzend kit
This is a really neat way of connecting together the batteries, and avoids me having to spot weld/solder batteries together. It makes my charging plans a little more difficult - it turns out that while this system looks like it will come together and come apart really well, it takes a long time to get things apart, and the plastic looks quite unhappy having been through about 10 deconstruction/reconstruction cycles.
This means my inital assumption that these would be less permanent than spot welding was incorrect, and that once assembled, the pack should be considered permanent.
Charging
Okay, so if we’re keeping all the batteries together, we need to charge them. I understand pretty intuitively I can’t just shoot ~17V across them and expect them to charge, I need to look at charging properly.
Research lead me to using a Battery Management System to handle both cell balancing and things like low-voltage cutoff, short circuit protection and the like. I got one of these and wired it up correctly. I fed it 16.8 volts, things charged and I was pretty happy. There’s a lot of these boards on ebay too, but I figured I’d stick with the same vendor as the other gear.
Unfortunately, after only 2-3 charge/drain/charge cycles, it died. Something somewhere wasn’t happy. Upon debugging, I managed to short something which made an almighty bang and released some smoke. I don’t think I’ve ever moved so quickly to deconstruct what was potentially about to become a bomb!
I got another BMS and ran into the same problem. Long story short, they weren’t working for me, and weren’t providing reliable, in-field power.
As an aside, I made the incorrect assumption that the advertised name of “4S 30A 14.8V Li-ion Lithium 18650 Battery BMS Packs PCB Protection Board Balanced” meant I would get 14.8V out, and no longer require a DC-DC. This was just the midway discharged/nominal voltage of a 4S pack, not an output rating.
The final solution I went for was taking a leaf out the book of RC hobbyists - I got an external balance charger to both charge and balance my cells. I got the Tunigy Accusell S60 from Hobbyking, and some wires to connect my battery to the balance port. This has so far worked an absolute treat, but it leaves me without short circuit/overcurrent protection in the battery. I need to be responsible in the field.
Voltage
Okay, so assembly/dissasembly is a bit tough, charging is a nightmare, does it get worse?
Yeah.
My Li-Ion batteries, which I mentioned last time are Samsung 35E models, have a maximum charge of 4.2V per cell. In a 4xseries configuration, that becomes 16.8V. I also noted last time that’s above the radio’s input voltage, I need to shed about 1.5V for the first 25% or so of my time in the field.
The cheap boost/buck converter I got from ebay was the solution, on paper, but I hadn’t considered the practical implications of this hardware. I was worried about RF noise generated by the converter, but in reality heat dissipation was the real problem. It became quickly apparent through a flickering screen and sudden power-offs that 10W was a struggle for the DC/DC despite having the current rating. I traced it back to a lack of good heat dissipation, compromising the current carrying performance of the converter.
Breaking it down, I’m trying to drop 1.5V @ 10-15A, P=IV gives 22.5W in a 100% efficient, best case scenario. In reality, it’ll be more than that, so let’s round up to 30W. To get the converter to work properly, I added a small PC fan to the heatsink, but the tiny wiring on that has already broken.
It’s finnicky, unreliable and too fragile for field use. Looking in more depth, that 22-30W overhead is a huge loss that my power budget just doesn’t account for. If the radio is consuming 7A @ 13.8V for 10W output, that’s 96.6w… so my conversion loss is equivalent to 25-30% of my original operating budget? That’s way too high.
The RSGB in their highly informative Radio Comms handbook suggests using a pair of bridge rectifiers in line with switches to short them out as battery voltage gets healthier. I have the gear to do this, but that’s more power loss - 4 diodes per rectifier, and voltage drop varies with current throughput. I reckon approx 2V on RX and 3.6V drop on TX for each bridge, so that’s a power loss of 27W @ 15A per bridge.
That’s a lot of heat to sink, and a lot of power to lose from my overall battery capacity.
To work around this, I have been charging the battery to 80%, and that provides a healthy voltage for the radio. It’s not a great solution, and I am seeing balance issues, so I need to fully charge the battery and then slowly discharge it periodically to ensure things are balanced nicely. The charger can do this for me, but it sucks I have to do it.
This is the killer. I really don’t want to climb a hill, set up a station and have to work with a compromised power system. There is just too much risk of failure in any one component in what has become a complicated, inefficient and fragile chain.
Solution
So the solution is pretty simple - LiFePo batteries in a 4S configuration present around 13-14V to the radio. That’s bang in the region of what the radio needs.
No DC/DC, no faff, less unreliable bits to break. Just plug & play. Better yet, you can buy them pre-built from hobbyking for RC cars in 4200mAh & 8400mAh configuration for <£50 and <£100.
In fact, James M0JCQ discusses it on his great blog & youtube channel. I wish I’d seen this in May.
Don’t make my mistakes, buy the right kit.
Alternatively: Do make my mistakes and learn a shitload about Lithium Ion Batteries in the process.
Tags: Radio In a Field